In today’s IT world, managing servers remotely is more important than ever. Windows Remote Management (WinRM) is a helpful tool that makes it easy to control and communicate with Windows-based servers from a distance. This guide will walk you through the steps to set up WinRM on a Windows Server, ensuring you can manage your servers securely and efficiently.
Understanding WinRM
Windows Remote Management (WinRM) is a Windows-based service that facilitates remote management capabilities. It utilizes the WS-Management protocol to allow administrators to execute commands, retrieve data, and manage configurations on remote systems. By enabling WinRM, IT professionals can enhance operational efficiency and reduce the need for physical presence at server locations.
Benefits of Configuring WinRM
Configuring WinRM on your Windows Server offers numerous benefits, including:
- Enhanced Remote Management: Admins can perform tasks remotely, saving time and resources.
- Increased Security: Secure communication over HTTPS ensures data protection during remote sessions.
- Streamlined Operations: Automate routine tasks and manage multiple servers from a central location.
Prerequisites
Before diving into the configuration steps, ensure you have:
- Administrative privileges on the Windows Server.
- A Fully Qualified Domain Name (FQDN) generates the self-signed certificate.
- PowerShell access for executing commands.
Steps to Configure WinRM
Step 1
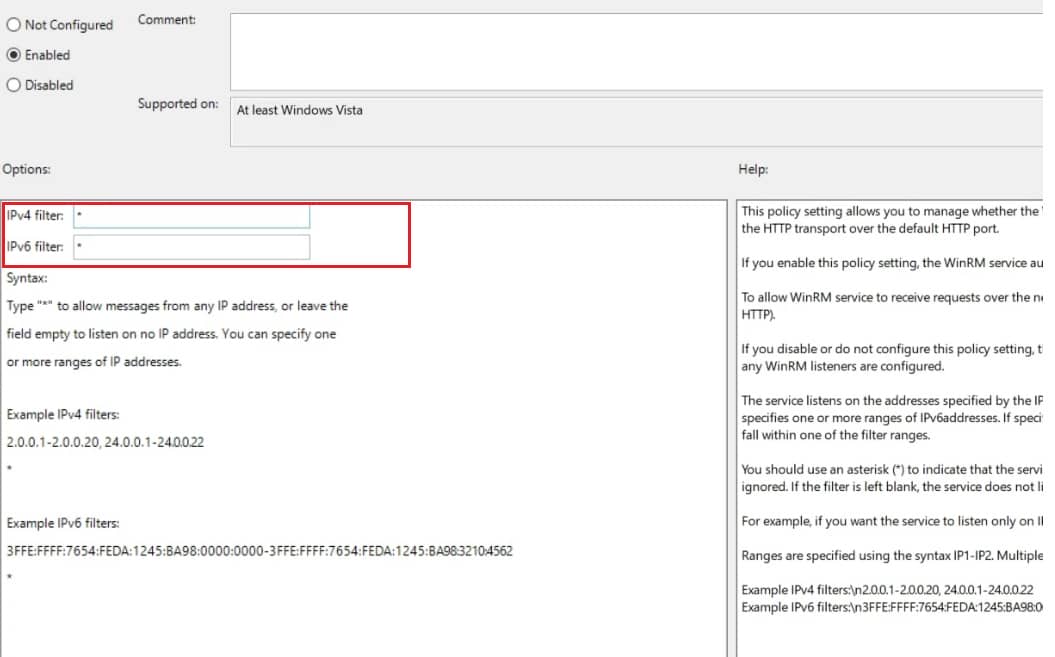
Enable Remote Server Management Through Group Policy
- Open Local Group Policy Editor:
- Press Windows + R, type gpedit.msc, and press Enter.
- Navigate to Computer Configuration -> Administrative Templates -> Windows Components -> Windows Remote Management (WinRM) -> WinRM Service.
- Allow Remote Server Management:
- Double-click on Allow remote server management through WinRM.
- Enable the policy and enter a star (*) in both IPv4 and IPv6 filter boxes.
- Click Apply, then OK.
Step 2
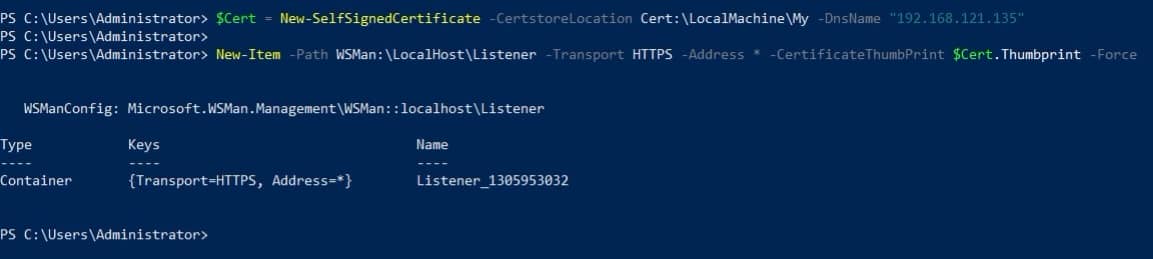
Generate a Self-Signed Certificate and Enable WinRM Listener
Generate Self-Signed Certificate:
Open PowerShell as an administrator.
Execute the following command, replacing YOUR_FQDN with your server’s FQDN:
$Cert = New-SelfSignedCertificate -CertstoreLocation Cert:\LocalMachine\My -DnsName "YOUR_FQDN"
Enable WinRM Listener:
Run the following command to create a new WinRM listener:
New-Item -Path WSMan:\LocalHost\Listener -Transport HTTPS -Address * -CertificateThumbPrint $Cert.Thumbprint -Force
Step 3
Enable Incoming Firewall Rule for WinRM HTTPS Port 5986
- Open Firewall Settings:
- Press Windows + R, type wf.msc, and press Enter.
- In the left pane, select Inbound Rules.
- Create New Rule:
- Right-click
Inbound Rules and select New Rule. - Choose Port and click Next.
- Select TCP and specify port 5986.
- Check Domain, Private, and Public options.
- Name the rule (e.g., WinRM HTTPS Port) and click Finish.
- Right-click
Step 4
Validate WinRM Ports
- Validate HTTP Port 5985:
- Open PowerShell and run:
Test-NetConnection YOUR_FQDN -Port 5985
- Open PowerShell and run:
- Validate HTTPS Port 5986:
- Execute the following command in PowerShell:
Test-NetConnection YOUR_FQDN -Port 5986
- Execute the following command in PowerShell:
Ensuring Secure and Effective Remote Management
By following these steps, you have successfully configured WinRM on your Windows Server, enabling secure remote management capabilities. This setup not only enhances operational efficiency but also ensures that your remote connections are secure, leveraging HTTPS for encrypted communication.
Video Tutorial
Frequently Asked Questions
What is WinRM?
WinRM stands for Windows Remote Management. It is a Microsoft implementation of the WS-Management protocol, which allows administrators to remotely execute commands and manage Windows-based servers.
Why is configuring WinRM important?
Configuring WinRM is essential for enabling remote management of Windows servers. It allows administrators to perform tasks, retrieve information, and manage server configurations without needing physical access to the server.
How do I generate a self-signed certificate for WinRM?
You can generate a self-signed certificate using PowerShell with the New-SelfSignedCertificate cmdlet. Ensure to use your server’s FQDN while generating the certificate.
What ports are used by WinRM?
WinRM commonly uses port 5985 for HTTP and port 5986 for HTTPS. These ports need to be open and configured for proper WinRM functionality.
How can I test if WinRM is working correctly?
You can validate the functionality of WinRM by using the Test-NetConnection cmdlet in PowerShell. This cmdlet helps you check connectivity on the specified ports (5985 for HTTP and 5986 for HTTPS).
Is WinRM secure?
Yes, WinRM can be configured to use HTTPS, which encrypts the data transmitted between the client and the server. This ensures secure communication and protects against unauthorized access.
Conclusion
Configuring WinRM on a Windows Server is a critical step in modern IT management, providing robust remote management capabilities while ensuring security. By following the outlined steps, you can efficiently set up WinRM, enabling seamless and secure remote administration of your Windows servers. Whether you’re automating routine tasks or managing multiple servers from a central location, WinRM is an indispensable tool for enhancing your IT infrastructure.
A big thank you for exploring TechsBucket! Your visit means a lot to us, and we’re grateful for your time on our platform. If you have any feedback or suggestions, we’d love to hear them. Looking forward to serving you again soon!