
Your web-server is only as secure as you make it but security isn’t only about protecting your server against attackers, it is also about protecting your clients from Man In The Middle(MITM) attacks. Securing your connections using the TLS protocol(successor of SSL) is strongly recommended if your website allows user registration, economic transactions or requests private information, otherwise plain text passwords, credit card numbers or confidential data could be easily stolen by MITM attackers.There are many cryptographic libraries to choose from. While NSS is recommended, OpenSSL is still dominant.
While OpenSSL uses x509 format and stores the certificates in files, NSS uses the PKCS12 format for certificates which it imports to a database. Genkey supports both, however it doesn’t allow to specify the cryptographic or the digest algorithm and the defaults can be considered weak as it uses SHA1 as a digest algorithm.
Create a Certificate using OpenSSL
1. Generate Private Keys
First generate the private key, in this example we will use a 2048 RSA key
# openssl genrsa -out myhost.com.key 2048

2. Create SCR
Create a Certificate Signing Request(CSR). The Common Name field must be your server’s hostname
# openssl req -new -key myhost.com.key -out myhost.com.csr -sha512
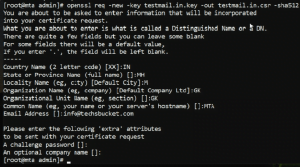
A message digest algorithm like SHA2 or stronger is recommended, but it’s more important for the certificate than for the request. However your CA decides which message digest they use for the certificate.
Now give your CSR to your Certificate Authority(CA) so they can sign your key and give you a certificate. Alternatively you can self-sign it, but bear in mind of the security issues that it poses and that browser will warn users about this:
# openssl x509 -req -days 365 -in myhost.com.csr -signkey myhost.com.key -out myhost.com.crt -sha512

Once your CA has signed it they will give you the certificate(.crt file). Now move the private key and the certificate to their respective directories:
# cp myhost.com.crt /etc/pki/tls/certs/

# cp myhost.com.key /etc/pki/tls/private/myhost.com.key
The Certificate Signing Request(CSR) can be deleted as it becomes useless once you have obtained your certificate. Alternatively put it along your private key.
# cp myhost.com.csr /etc/pki/tls/private/myhost.com.csr
3. Context in SELinux
Set the correct context of these files for SELinux
# restorecon -RvF /etc/pki
The last step is to configure the webserver of your host for the TLS protocol using the key and the certificate files you have just created.
4. Create Postfix TSL
Once your TLS/SSL key generated then add these keys path into Postfix main.cf file, to build postfix with TLS support just add the following entry in the Postfix main file /etc/postfix/main.cf directory and save the file
smtpd_use_tls = yes
smtpd_tls_key_file = /etc/pki/tls/private/myhost.com.key
smtpd_tls_cert_file = /etc/pki/tls/certs/myhost.com.crt

smtpd_tls_loglevel = 3
smtpd_tls_received_header = yes
smtpd_tls_session_cache_timeout = 3600s
tls_random_source = dev:/dev/urandom
smtp_use_tls = yes
5. Restart Services
Finally, restart Postfix and Httpd to take effect
# sudo systemctl restart postfix

# sudo systemctl restart httpd
![]()
Video Tutorial
In this post, I have covered how to create TLS / SSL certificate on CentOS 7 in a very easy way. Follow and share with your friends also ask by comment or from the contact section for your queries.


This page really has all of the information and facts I wanted concerning this subject and didn’t know who to ask.
These are truly fantastic ideas in regarding blogging. You have touched
some good factors here. Any way keep up wrinting.
Hello there! I know this is somewhat off topic but I
was wondering if you knew where I could locate a captcha plugin for my comment form?
I’m using the same blog platform as yours and I’m having trouble finding one?
Thanks a lot!
You can add one reCAPTCHA plugin..