
LAMP is a very common example of a web service stack, named as an acronym of the names of its original four open-source components: the Linux operating system, the Apache HTTP Server, the MySQL relational database management system, and the PHP programming language. Lets learn how to install LAMP stack On CentOS 7.
What is LAMP ?
The LAMP stands for Linux, Apache, MySQL/MariaDB, and PHP, Perl, or Python. It is freely available across the internet designed for Linux and windows operating systems. LAMP stack is the combination of OS and software which allows you to host the website and some other application through the Apache server, where data will be run and saved on the SQL database. Here I am sharing LAMP installation Tutorial for CentOS7.
- Apache : for running the web server ( HTTP / Port 80 )
- MySQL/MariaDB : Saves the website / application’s data ( Port 3306 )
- PHP : for processing the web content
Install Apache ( HTTP / Port 80 )
Before installing http we will have to check update first by below command
#  sudo yum check-update

#  sudo yum update -y

#  sudo yum install httpd -y
Once installation done, start the apache service and enable it on boot
#  sudo systemctl start httpd.service

#  sudo systemctl enable httpd.service
If the firewall is installed and running, we need to add some apache ports to open access from the following command
#  firewall-cmd --permanent --add-port=80/tcp

#  firewall-cmd --permanent --add-port=443/tcp
Restart the firewall service from following command
# firewall-cmd --reload
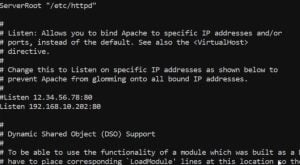
Now, edit the configuration file of Apache, you will find config file on the path /etc/httpd/conf/httpd.conf
Here I am using vi editor by login into the server via telnet from the root user. Now edit the config file by adding your server’s host name and FQDN as per below. If you are using vi editor you can insert text by pressing ” i ” key and save the edited file by pressing ” Esc ” and ” wq! ” then enter.
# sudo vi /etc/httpd/conf/httpd.conf
Find Listen and add your server’s IP address as below
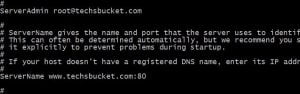
Find ServerAdmin, ServerName and add your email id and ServerName
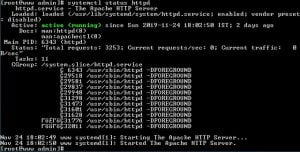
To check the httpd status run the following command
# sudo systemctl status httpd
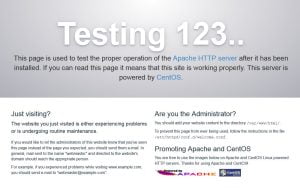
After the above steps, now test your apache server on the local computer browser through your server’s FQDN or IP address ( www.mydomain.com or 192.168.10.202 ) replace with your server’s name & IP, should be look like following picture
Install MariaDB
MariaDB is the replacement for MySQL which is very easy for installation and for setting up the database for our website or web applications. It has good performance, improvements, speed and easy to deployment. MariaDB has more storage engines than MySQL which includes Cassandra, XtraDB and OQGRAPH
Run following command to install the MariaDB
# sudo yum install mariadb-server
Once the installation has done, start and make it enable on boot
#  sudo systemctl start mariadb

#  sudo systemctl enable mariadb
Now, secure the MariaDB installation
# mysql_secure_installation
- Enter current password for root (enter for none):
- Set root password? [Y/n] :
- New password :
- Re-enter new password :
- Remove anonymous users? [Y/n] :
- Disallow root login remotely? [Y/n] :
- Remove test database and access to it? [Y/n] :
- Reload privilege tables now? [Y/n] :
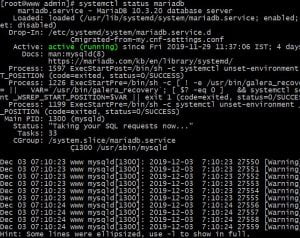
Check the status by following command, if MariaDB has successfully started then the status should be active as per following picture
# sudo systemctl status mariadb
Now, Create SQL Database and SQL user, grant full permission
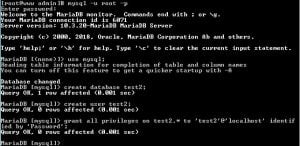
# sudo mysql -u root -p
Enter your root password which you had set at the time of MariaDB installation and create database as well as set the full permission on the database
#  use mysql

#  create database test2;

#  create user test2;

#  grant all privileges on test2.* to 'test2'@'localhost' identified by 'yourpassword';
In this tutorial we have learnt how to install latest MySQL, MariaDB in the CentOS7 as well as we have successfully created the database along with full user permission. The main reason to create database is to store our website’s data on it. We can assign the database name and database username in our config file which is located inside the website directory i.e /var/www/html
Install PHP
PHP (recursive acronym for PHP: Hypertext Preprocessor) is a widely used open-source general purpose scripting language that is especially suited for web development and can be embedded into HTML.
To Install PHP and its extensions use the following commands
# sudo dnf install dnf-utils http://rpms.remirepo.net/enterprise/remi-release-8.rpm

# sudo dnf module list php

# sudo dnf module reset php

# sudo dnf module enable php:remi-7.3
Install some common modules of PHP
# sudo dnf install php php-opcache php-gd php-curl php-mysqlnd

# sudo systemctl enable –now php-fpm
Allow PHP to work with Apache
# sudo chcon -Rt httpd_sys_rw_content_t /var/www

# sudo systemctl restart httpd
Test the PHP
Create one sample file as “test.php” in Apache root folder in /var/www/html
# sudo vi /var/www/html/test.php
Add the following script and save the file by ” Esc ” ” wq! ” and restart the httpd
<?php
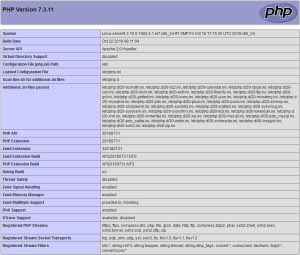
phpinfo();
?>
# sudo systemctl restart httpd
You can test the PHP through your web browser with your server IP ” 127.0.0.1/test.php ” you will see page like below
Install phpMyAdmin
phpMyAdmin is an opensource tool which is used to manage MySQL databases thorough you computer web browser. By default official RHEL 7 or CentOS 7 repositories doesn’t provide any binary package for PhpMyAdmin Web Interface. So let us install it from EPEL repository
#  sudo yum install epel-release

#  sudo yum install phpmyadmin -y
Configure phpMyAdmin
By default we can access phpMyAdmin locally only, to make it globally access follow the below steps
# sudo vi /etc/httpd/conf.d/phpMyAdmin.conf
Find and comment the whole /<Directory> section and add the lines as shown below: And replace 127.0.0.1 with ( your-server IP )
# phpMyAdmin - Web based MySQL browser written in php
#
# Allows only localhost by default
#
# But allowing phpMyAdmin to anyone other than localhost should be considered
# dangerous unless properly secured by SSL

Alias /phpMyAdmin /usr/share/phpMyAdmin
Alias /phpmyadmin /usr/share/phpMyAdmin

<Directory /usr/share/phpMyAdmin/>
AddDefaultCharset UTF-8

<IfModule mod_authz_core.c>
# Apache 2.4
<RequireAny>
Require all granted
</RequireAny>
</IfModule>
<IfModule !mod_authz_core.c>
# Apache 2.2
Order Deny,Allow
Deny from All
Allow from 192.168.10.202
Allow from ::1
</IfModule>
</Directory>

<Directory /usr/share/phpMyAdmin/setup/>
<IfModule mod_authz_core.c>
# Apache 2.4
<RequireAny>
Require ip 192.168.10.202
Require ip ::1
</RequireAny>
</IfModule>
<IfModule !mod_authz_core.c>
# Apache 2.2
Order Deny,Allow
Deny from All
Allow from 127.0.0.1
Allow from ::1
</IfModule>
</Directory>

# These directories do not require access over HTTP - taken from the original
# phpMyAdmin upstream tarball
#
<Directory /usr/share/phpMyAdmin/libraries/>
Order Deny,Allow
Deny from All
Allow from None
</Directory>

<Directory /usr/share/phpMyAdmin/setup/lib/>
Order Deny,Allow
Deny from All
Allow from None
</Directory>

<Directory /usr/share/phpMyAdmin/setup/frames/>
Order Deny,Allow
Deny from All
Allow from None
</Directory>

# This configuration prevents mod_security at phpMyAdmin directories from
# filtering SQL etc. This may break your mod_security implementation.
#
#<IfModule mod_security.c>
# <Directory /usr/share/phpMyAdmin/>
# SecRuleInheritance Off
# </Directory>
#</IfModule>
Edit “config.inc.php” file and change from “cookie” to “http” to change the authentication in phpMyAdmin
# sudo vi /etc/phpMyAdmin/config.inc.php
You will have to find ” cookie “

Replace ” cookie ” with ” http “

Restart the Apache service
# sudo systemctl restart httpd
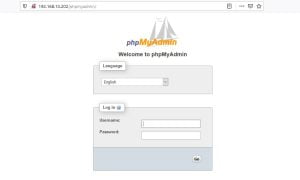
Now you can access the phpMyAdmin console by navigating to the URL http://yourserver-ip-address/phpmyadmin/ from your computer browser, page will appear like below.
Video Tutorial
In this tutorial we have covered how to setup LAMP. Hope you followed all the steps and successfully installed LAMP. If you have any query please comment below and don’t forget to share.


Hey there just wanted to give you a quick heads up.
The words in your article seem to be running off the screen in Firefox.
I’m not sure if this is a format issue or something to do
with web browser compatibility but I figured I’d post to
let you know. The style and design look great though! Hope you
get the issue solved soon. Cheers
When I originally commented I clicked the “Notify me when new comments are added” checkbox and now each time a comment
is added I get several e-mails with the same comment. Is there any way you can remove people from that
service? Thanks!
Thank You Mate…
Hello, i think that i saw you visited my site thus i came to “return the favor”.I’m trying to
find things to improve my website!I suppose its ok to use some of your ideas!!
mmm.. ! I think I didn’t visit to your website.. yes you can use some of ideas from my blog..