YouTube’s “Stats for Nerds” might sound like a feature exclusive to tech enthusiasts, but in reality, it’s a powerful tool for anyone interested in understanding video playback. Whether you’re a casual viewer facing buffering issues or a content creator eager to monitor video quality, this feature offers a detailed breakdown of technical data.
While the name suggests that only tech-savvy users would benefit from it, this tool provides essential insights into your video’s performance, such as the video quality, connection speed, and network activity. This article will guide you through how to enable and interpret YouTube’s “Stats for Nerds,” so you can make the most of your viewing or content creation experience.

What is ‘Stats for Nerds’ on YouTube?
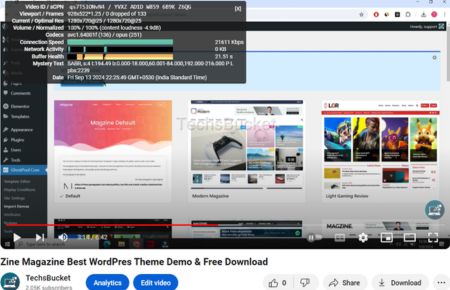
“Stats for Nerds” is a YouTube feature that overlays a small window on your video, displaying real-time playback data. It provides a variety of information such as current video resolution, codecs, buffering status, and network activity. This can be invaluable for diagnosing video playback issues, checking the quality of a video stream, or simply satisfying your curiosity about how YouTube works behind the scenes.
This feature is especially useful for content creators, engineers, and anyone dealing with video playback issues like buffering or poor video quality. But even casual users might find it helpful to understand why a video isn’t playing as smoothly as expected or to check if they’re getting the highest resolution available.
Enabling Stats for Nerds on YouTube
Activating Stats for Nerds depends on the device you’re using. Let’s walk through the process for different platforms, starting with desktop browsers and then moving to mobile and other devices.
Desktop (Windows, Linux, Mac)
Enabling Stats for Nerds on desktop is straightforward, but many users might not know the feature even exists, as it’s hidden behind a right-click menu. Here’s how to turn it on:
- Open YouTube.com in any browser (Chrome, Firefox, Safari, etc.).
- Start playing the video you want to analyze.
- Right-click the video, which opens a small video options menu. However, ignore this first menu.
- Right-click again to access the extended options menu.
- Select Stats for Nerds from the list.
Immediately, you’ll see an overlay with various stats that refresh in real-time.
Mobile Devices (Android, iOS, and iPadOS)
On mobile devices, the steps differ slightly based on the operating system.
For Android:
- Open the YouTube app on your Android device.
- Tap on your profile icon, and navigate to Settings.
- Go to General and enable Stats for Nerds.
- Start any video.
- Tap the three vertical dots in the upper-right corner of the video player.
- Choose Stats from the drop-down menu.
For iOS and iPadOS:
- Open the YouTube app on your iPhone or iPad.
- Tap on your profile icon and navigate to Settings > General.
- Enable Stats for Nerds.
- Start a video, and tap the video to reveal the options.
- Tap the settings gear icon, then select Additional Settings.
- Finally, tap Stats for Nerds.
Smart TVs, Consoles, and Streaming Devices
Enabling Stats for Nerds on smart TVs and consoles follows a similar path, although the settings menu might vary slightly depending on the device.
- Open the YouTube app on your Smart TV, console, or streaming device (like Roku or Amazon Fire Stick).
- Start playing a video.
- Bring up the video playback controls (usually by pressing the remote’s select button).
- Navigate to the Settings option and scroll to find Stats for Nerds.
By following these steps, you can get a detailed breakdown of your video’s performance on almost any platform.
Understanding the Stats for Nerds Data
Once you’ve enabled Stats for Nerds, a window appears displaying a plethora of data. For the uninitiated, this might look like techno-babble, but each statistic can be extremely useful. Here’s a breakdown of what each stat means:
Video ID / sCPN
- The Video ID is YouTube’s unique identifier for the video you’re watching. Every video on YouTube has a distinct Video ID in the platform’s database.
- The sCPN is a code representing your specific playback instance of the video. It helps YouTube identify the session for troubleshooting purposes.
Viewport / Frames
- The Viewport stat displays the resolution of the YouTube player (not the video itself). This represents the size at which the video is being shown in your browser or app.
- Frames refers to the current frame number in the video. It’s an indicator of how many frames have been displayed so far during playback.
Current / Optimal Res
- The Current Res shows the resolution at which the video is being played. This can vary depending on your internet connection or playback settings.
- The Optimal Res displays the video’s original resolution, which is the highest quality available for that video.
Volume / Normalized
- Volume reflects the current volume setting for the video you’re watching.
- Normalized shows the amount of normalization applied to the audio. Normalization is a process where the loud and quiet parts of the audio are made closer in volume to create a more consistent sound level.
Codecs
- The Codecs stat shows the type of video and audio codecs being used. Codecs are algorithms that compress and decompress video and audio data. Common video codecs include H.264 and VP9.
Color
- This stat indicates the current color range used in the video, which could vary depending on the device or video quality settings.
Connection Speed
- This shows the speed of your internet connection. A faster speed usually means better streaming quality with less buffering, while a slower connection may lead to interruptions.
Network Activity
- Network Activity measures the amount of data being transmitted from YouTube’s servers to your device. It is directly proportional to the quality and bitrate of the video.
Buffer Health
- Buffer Health shows how much of the video is buffered in advance, helping to prevent playback issues during temporary network slowdowns. A longer buffer means the video can play without interruptions, even if the connection momentarily dips.
Mystery Text
- The so-called Mystery Text is a complex string of characters that usually puzzles users. It includes information like stream segments, buffer range, and session details. Here’s an example:
s:4 t:1759.84 b:1459.421-1884.549 P pbs:3354.s:4refers to the stream or segment number.t:1759.84is the current timestamp, measured in seconds.b:1459.421-1884.549represents the buffer range in seconds. It shows the range of video content pre-loaded for uninterrupted playback.- The letter
Pindicates the video is currently paused. pbs:3354stands for Playback Session and is unique to the current viewing session.
Troubleshooting with Stats for Nerds
If you’re experiencing buffering, low resolution, or slow playback on YouTube, Stats for Nerds can help pinpoint the problem. Here are some common issues and how to identify them using the stats:
- Buffering Issues: If the video keeps pausing to buffer, check the Buffer Health and Network Activity. A low buffer means YouTube hasn’t pre-loaded enough of the video, possibly due to a slow internet connection.
- Low Resolution: If the video quality appears poor, look at the Current / Optimal Res. If the Current Res is significantly lower than the Optimal Res, it means YouTube has reduced the quality to match your internet speed.
- Slow Connection: A low Connection Speed indicates a problem with your internet connection. Try switching to a lower resolution or moving closer to your Wi-Fi router.
Final Words
YouTube’s “Stats for Nerds” might seem like an intimidating feature, but it offers invaluable insights into video playback. Whether you’re troubleshooting buffering issues, analyzing video quality, or just curious, Stats for Nerds provides real-time data to help improve your viewing experience. By understanding what each stat means, you can optimize your playback or identify connection problems before they ruin your viewing. With a little practice, you’ll be navigating this tool like a pro.


