Mac administrators can use the root user account to make changes that require access to more areas of the system. The ”root” is a superuser which have read and write privileges in the system. This includes files in other macOS user accounts, by default user “root” is disable in MacOS.
If you can log in to your Mac with your admin account which created during Mac installation, then you will get option to enable the root user. Today in this post we are going to learn how to enable “root” login in your MacOS
Steps To Enable root Login
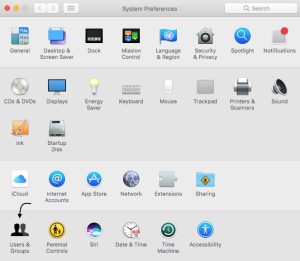
- Choose Apple menu > System Preferences, then click Users & Groups
- Click lock icon, then enter an administrator name and password
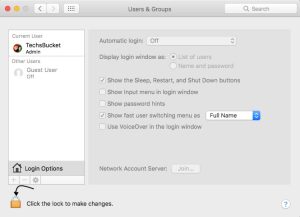
- Now, Click Login Options then Click Join
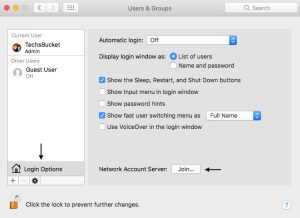
- Click Open Directory Utility

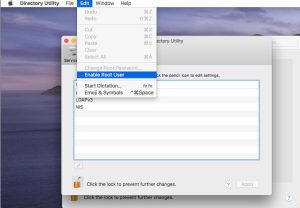
- Click lock icon in the Directory Utility window, then enter an administrator name and password
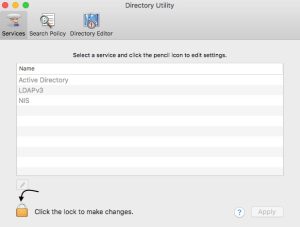
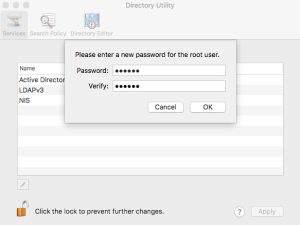
- From the menu bar in Directory Utility Choose Edit > Enable Root User, then enter the password that you want to use for the root user
Log in as the root user
When the root user is enabled, you have the privileges of the root user only while logged in as the root user.
- Choose Apple menu > Log Out to log out of your current user account
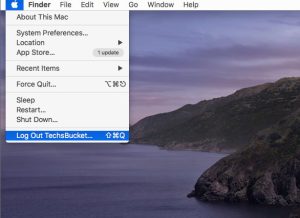
- At the login window, log in with the user name ”root” and the password you created for the root user

Change the root password
- Choose Apple menu > System Preferences, then click Users & Groups
- Click lock icon, then enter an administrator name and password
- Click Login Options then join
- Click Open Directory Utility
- Click the lock icon in the Directory Utility window, then enter an administrator name and password
- From the menu bar in Directory Utility, choose Edit > Change Root Password

- Enter a root password when prompted
Video Tutorial
In this post we have covered how to enable the root user on macOS. Comment below for your queries and suggestion or you can contact me any time via the contact page. I will be assisting you and try my best to clear your all doubts.