Table of Contents
OpenCart is an online store management system. It is based on PHP and uses a MySQL database and HTML components. Various languages and currencies are supported. It is freely available under the GNU General Public License. As of May 2016, 342,000 websites were using OpenCart.
In this article, we will show you how to download the OpenCart script and install this script in Rocket Linux 9 with all the latest dependencies which are required to function the OpenCart.
Steps to install Opencart on Rocky Linux 9
To run OpenCart on Rocky Linux you are going to be required the following services to be installed first.
Apache: This is a web server and this will run the script on any browser
MySQL: This will store the OpenCart data
PHP: This is very important, php will execute and run the OpenCart script
Deploy MariaDB and phpMyAdmin using Docker
Step 1
Login to Rocky Linux 9 and update the system first then install the Apache server. Once installation is done, start and enable httpd service.
# yum update -y

# yum install httpd -y

# systemctl start httpd.service

# systemctl enable httpd.service
If firewall is enabled the allow the Apache ports in the firewall.
#  firewall-cmd --permanent --add-port=80/tcp

#  firewall-cmd --permanent --add-port=443/tcp

#  firewall-cmd --reload
Step 2
Install MySQL server. Run the following command to install the MySQL server
# sudo yum install mysql-server
After installation, start MariaDB and enable it on the boot
# sudo systemctl start mysqld

# sudo systemctl enable mysqld
Secure installation MySQL
# mysql_secure_installation
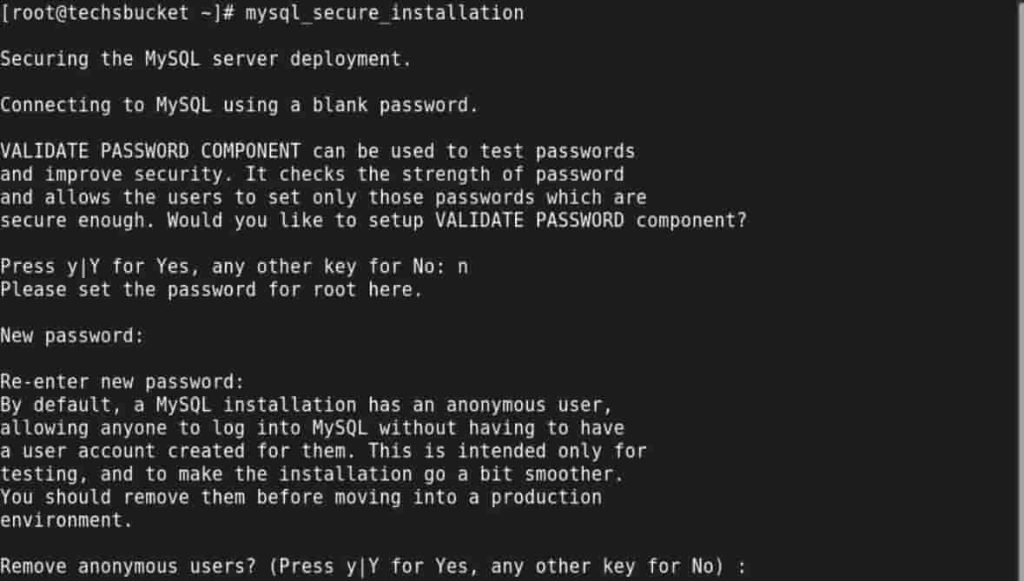
- New password :
- Re-enter new password :
- Remove anonymous users? [Y/n] :
- Disallow root login remotely? [Y/n] :
- Remove test database and access to it? [Y/n] :
- Reload privilege tables now? [Y/n] :
Step 3
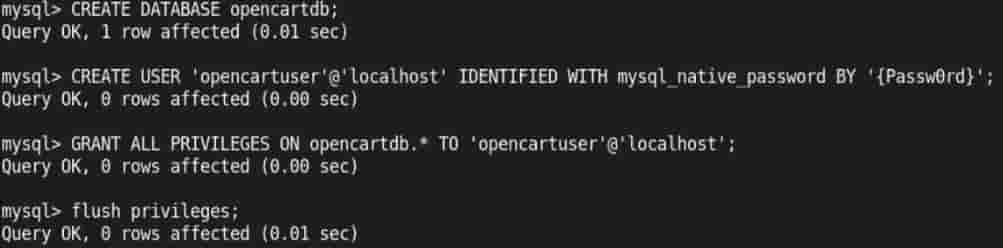
In this step, create a database and database user under MySQL. This will store all the data of the OpenCart script.
Create SQL Database and SQL user, grant full permission on Database
# sudo mysql -u root -p
Enter your root password which you had set at the time of mysql_secure_installation and create a database as well as give full permission on the database.
#  CREATE DATABASE opencartdb;

 #  CREATE USER 'opencartuser'@'localhost' IDENTIFIED WITH mysql_native_password BY '{Passw0rd};

#  GRANT ALL PRIVILEGES ON opencartdb.* TO 'opencartuser'@'localhost';

# FLUSH PRIVILEGES;
While performing by you, change the database user password.
Install VirtualBox 7 on Rocky Linux 9 | Alma Linux 9 | Red Hat 9
Step 4
Install PHP, this is very important to run the opencart script on the front end in any web browser.
# yum install php -y
Install some common important modules of PHP
# sudo yum install php php-opcache php-gd php-curl php-mysqlnd
# sudo yum install php openssl php-bcmath php-curl php-json php-mbstring php-tokenizer php-xml php-zip
Very Important command to execute, without this command script will not load on the browser.
# sudo systemctl enable --now php-fpm
Step 5
Download OpenCart script, unzip, and move the ‘upload’ folder into /var/www/html directory.

Rename the ‘upload‘ folder to any name. I have renamed it to ‘opencart‘
Now, rename ‘config-dist.php‘ to ‘config.php‘ under ‘opencart’ and ‘opencart/admin’ folders.

Step 6
Grant Apache user permission to the ‘opencart‘ under /var/www/html
# sudo chown -R apache:apache /var/www/html/opencart
Allow PHP to work with Apache. Restart the Apache after chcon command is fired.
# sudo chcon -Rt httpd_sys_rw_content_t /var/www

# sudo systemctl restart httpd

Step 7
Finally, open any browser and put the server IP or localhost with the directory name, this will show you the OpenCart installation page.
# localhost/opencart
The installation page will be reflected. Click on the Continue button and you will see Database details and Admin credentials to be filled. Put created database details from Step 3 and keep any admin username and password, this will be used to log in OpenCart admin panel.
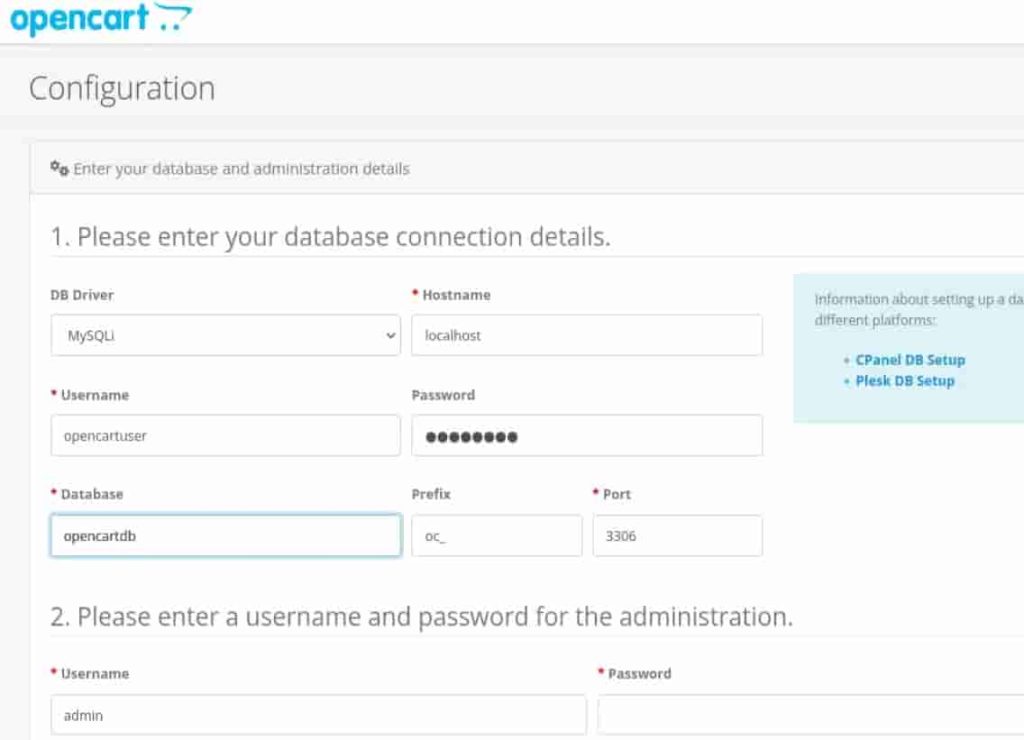
To access OpenCart the final URL will be localhost/opencart and for admin panel URL will be localhost/opencart/admin
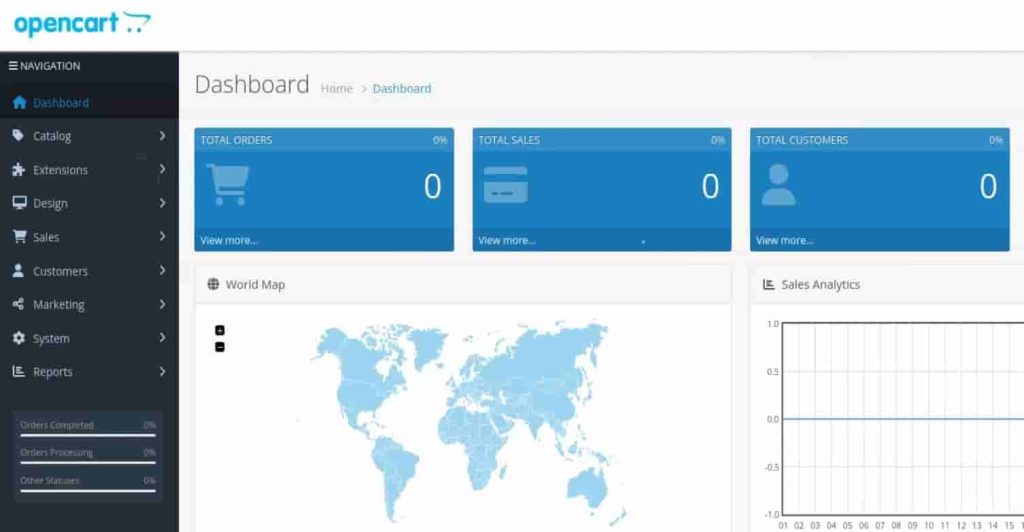
So, this is how you can access OpenCart admin panel. This admin panel has a lot of options and from there you will be able to post your product at any time.
Video Tutorial
In this article, we have covered how to install OpenCart and dependent services Apache, MySQL, PHP, and PHP’s important extension which are required to run OpenCart. Comment below or email me your doubts and suggestions if any.