
Postfix runs on AIX, BSD, HP-UX, Linux, macOS and Solaris. It is the default MTA for the macOS, NetBSD and Ubuntu operating systems. I am going to show you how to install and configure Postfix on CentOS 7 and let’s see how its work
What is Postfix ?
Postfix is a kind mechanism to sending email from the host to globally where it is installed and configured. Your host will become SMTP server when you are running Postfix in that machine. Postfix is an open source free MTA ( Mail Transfer Agent ) which is released by the IBM public license version 1.0. Most of the users are running their SMTP mechanism on the internet by Postfix MTA, it is the most popular and first in the MTA list where Exim server which is second most popular in MTA list.
Steps to Install Postfix
1. Open terminal, or you can access your server via telnet on another system by telnet. If postfix is not installed in your system then run the following command and also remove default sender sendmail.
# sudo yum remove sendmail

# sudo yum update -y

# sudo yum install postfix -y
2. As we have removed the default MTA ( Sendmail ), so we need to make postfix as default MTA from below command.
# alternatives --set mta /usr/sbin/postfix
If above command doesn’t work then try below command.
# alternatives --set mta /usr/sbin/sendmail.postfix
Steps to Configure Postfix
1. After installation part edit the postfix configuration file located in etc /postfix/main.cf , etc /postfix/master.cf and make the following changes properly. If you are operating postfix via telnet then edit with “vi” editor or if you are directly logged in then you should edit the file by navigating to postfix folder using default geditor.
# vi /etc/postfix/main.cf
2. Find the following and make changes as below
myhostname = mta.testmail.in
mydomain = testmail.in
myorigin = $mydomain
inet_interfaces = all
#inet_interfaces = localhost
mydestination = $myhostname, localhost, $mydomain
mynetworks = 127.0.0.0/8, /32
relay_domains = $mydestination
home_mailbox = Maildir/
Additionally, you can add some entries to make secure your IP from blacklisting. For more information please visit my bulk emailing section.
3. Now, edit the following file to open SMTP port which is located in same postfix folder etc /postfix/master.cf
# vi /etc/postfix/master.cf
Uncomment ( remove # ) as per highlighted and save
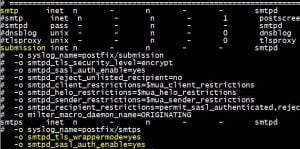
Make sure the above steps are done properly otherwise Postfix service will give error
4. Add SMTP ports in the firewall to open
#  firewall-cmd --permanent --add-port=25/tcp

#  firewall-cmd --permanent --add-port=587/tcp
5. After above steps, restart the postfix and enable it on boot
# sudo systemctl restart postfix

# sudo systemctl enable postfix
6. Check the postfix status, it should be Active and Running
# sudo systemctl status postfix

7. Now, test the Postfix by the following command
mail -s “Local Outbound SMTP Test” test@example.com < /dev/null

Video Tutorial
I hope you have followed all the steps and have done the right configuration. Postfix is the best mail sending mechanism which is openly and freely available, just install it and ask me for the help if you are facing any issues during Postfix setup.


Yesterday, while I was at work, my cousin stole my apple ipad
and tested to see if it can survive a 25 foot drop, just
so she can be a youtube sensation. My apple ipad is
now destroyed and she has 83 views. I know this
is entirely off topic but I had to share it with someone!
Thanks for another informative blog. The place else could I am getting
that kind of info written in such an ideal way? I’ve a venture
that I’m just now operating on, and I’ve been on the
look out for such information.
This text is worth everyone’s attention. When can I find out more?
When ambition ends happiness begins.
very good congratulations
it works, thanks !