Today in this post, we will learn about the Docker Swarm. In some previous posts, we have learned about containers, images, and yml files. We will see what is Docker Swarm and how can we use docker swarm in our production environment. We will go through some problem statements that will be resolved by the docker swarm. We already have seen how we can use the containers to run our application, how containers are helpful, and how we can execute multiple containers in a single machine. Now, the question comes, why do we need Docker Swarm, and what is Docker Swarm?
Docker Swarm is basically used to cluster your docker containers. Docker Swarm will be helping us in the following are the problem statements.
Problem Statement :
- How to Scale Containers?
- How to manage Containers or re-create if they fail/Crash?
- How to Upgrade the Service with Zero Down Time?
- How to Manage Containers on VMs, Nodes?
Docker Swarm :
- Docker Swarm is a clustering and scheduling tool for Docker containers.
- Swarm is Docker’s native support for orchestrating clusters of Docker engines.
- Orchestration : Define nodes. Define services. Set how many nodes you want to run and where, and you are done.
- At a high level, Swarm takes multiple Docker Engines running on different hosts and lets you use them together.
- Docker Swarm has Two Types of Nodes Master(Manager) and Worker.
- Every swarm starts out with one manager node designated as the leader.
- Swarm is highly available thanks to its implementation of the Raft algorithm.
- Raft Algo : The leader node is constantly checking in with its fellow manager nodes and syncing their states.
Features :
Task Scheduling : Suppose we have an end number of services, so what do we need to do ? we need to deploy our services as a stack in a swarm. We will create a stack of services in a swarm and when you declare your services we will provide a swarm with important information about how actually your services need to be run that includes the parameters like how many replicas of each service, how the replica should be distributed or when they should run on the certain mode. If service goes down, your containers still run.
Load Balancing : Suppose your service is running on 10 Nginx servers out of these servers one is master and the others are workers. Now, it’s the responsibility of the docker swarm to maintain the traffic on all the Nginx nodes for 9 workers and 1 master node as well as master will also serve the traffic by managing these 9 workers. So, load balancing is another feature of the docker swarm.
Rolling Updates : If you are a DevOps then you would have seen many times at run time we execute multiple servers for a single application. Somehow some bugs were found in production and we need to patch our production. In this case, the docker swarm will help to patch on running containers. In docker swarm, you can define 2 containers at the same time that means 2 containers will go down and at the same time 2 new containers will be up and run along with the new patch. It means, if 10 containers are running on an application then 2 containers will be spun up with the new functionality, and 8 containers still running with the old. The application is running and the user is not impacting. So, you can see there is no downtime. We can down another 2 containers and add another 2 containers. So, this process is called a rolling update with no downtime we can update the services.
Security : Docker swarm comes with great security features. When a node joins a swarm it uses a token that is encrypted and decrypted by the docker swarm.
Steps to Create Service on Docker Swarm And Container Replicas
To enable Docker Swarm, we will have to run initializing command. To enable, open your Terminal windows and run the following command with the root privilege. Docker and docker-compose should be installed on your machine before running the docker swarm.
Step 1
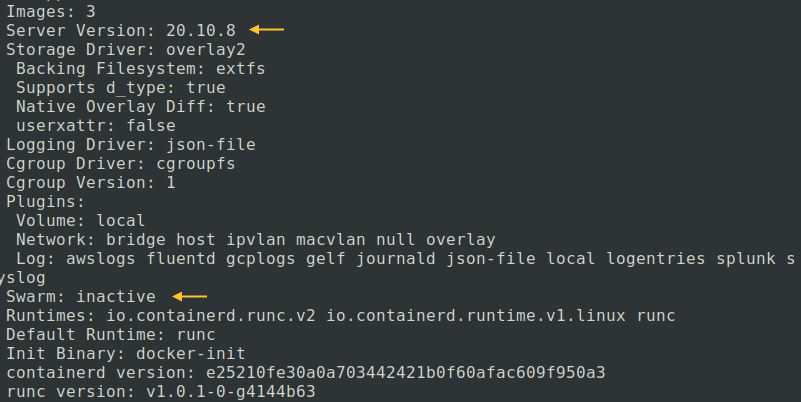
Verify the docker with the docker info command as well as you will see docker swarm is in-active.
# sudo docker info
Step 2
In this step, we will initialize the docker swarm.
# sudo docker swarm init
The output should be like the below image, which means the docker swarm is enabled after the init command.
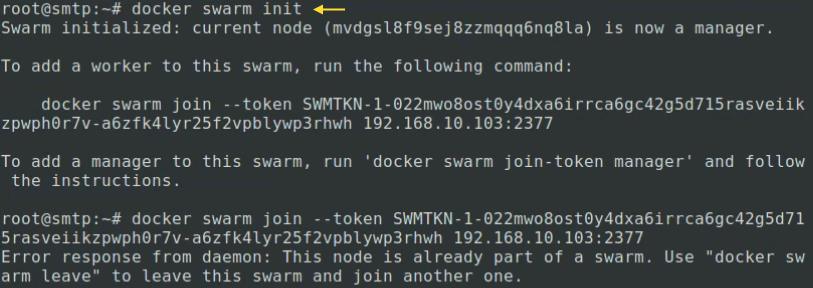
Note : If you have multiple IP addresses on a single server then you will have to define the IP address in the init command otherwise you will get an error.
# sudo docker swarm init --advertise-addr 192.168.xx.xx
Step 3
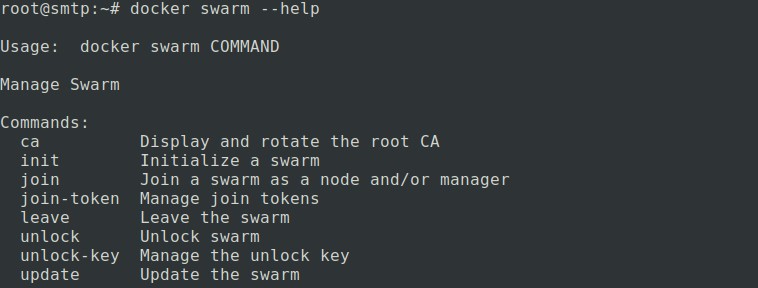
If you want to see how many commands are available with the docker swarm, simply run the below command that will list out all the available command.
# sudo docker swarm --help
Step 4
We are going to add one service now which will ping google.com. We will add an alpine service that service will ping for www.google.com. We will use the docker service create command.
# sudo docker service create alpine ping www.google.com

Step 5
Now, check the created service. With this command, we can see some details for the service along with Replicas.
# sudo docker service ls

Step 6
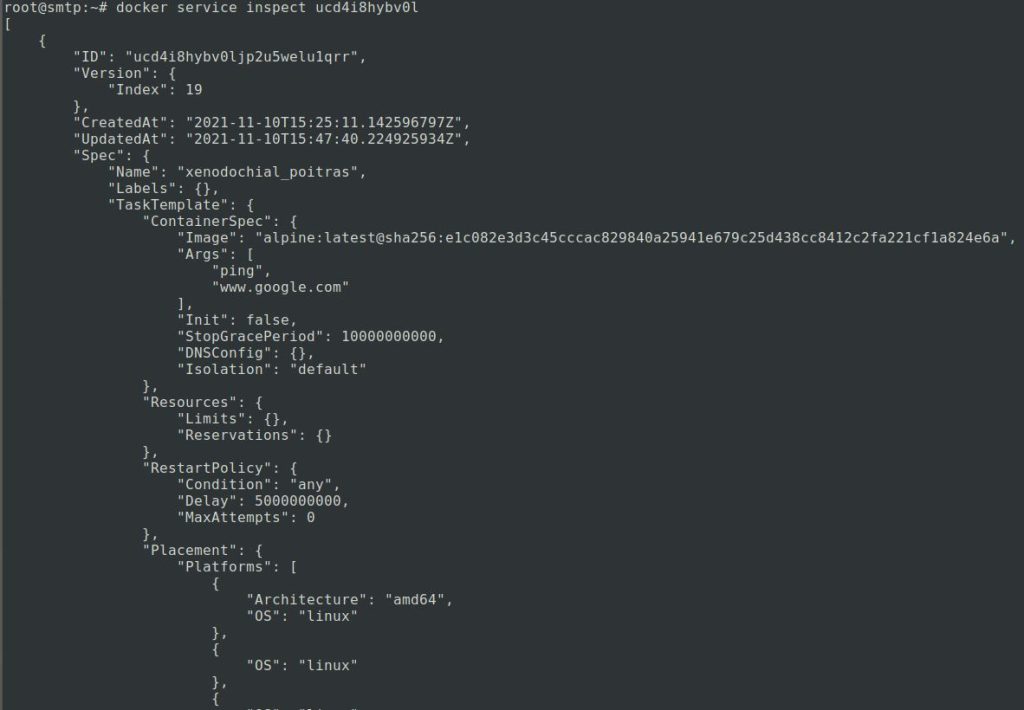
This command will inspect the service. Define service name or service ID in the command to inspect the service. I have mentioned the service ID.
# sudo docker service inspect NAME OR ID
Step 7
Now, if you want see which container is actually executing your service on a docker-machine, first we need to define the docker service name as per Step 5. We can define the service name or service id with the command and you will see your container details.
# sudo docker service ps NAME OR ID

Step 8
In this step, we will create replicas. I will create 4 replicas of my alpine service. We can check the number of replicas with the docker service ls command.
# sudo docker service update NAME OR ID --replicas 4

We have created 4 replicas of the alpine service. To verify enter the below command one by one
# sudo docker service ls

# sudo docker service ps NAME OR ID

As you can see in the above image, 4 replicas of a single service are up and running
Step 9
In this step, we will stop 1 container from the 4 replicas. We have stopped the container by Container ID “8e1bc16d1e6c” with the following command.
# sudo docker container rm -f CONTAINER ID
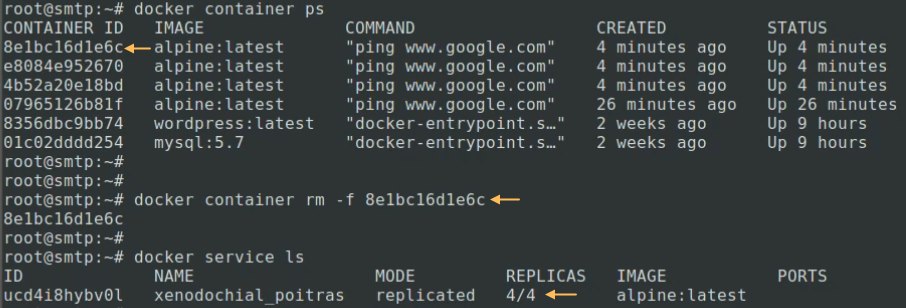
After stopping the 1 container still, you will see 4 replicas. So, if you stop any container this will create one more replica of that stopped container. To verify, one more replica was added after stopping the 1 container, simply follow the docker ps command.
# sudo docker service ps NAME OR ID

As you can see 1 container stopped and immediately replica of the stopped container is created was up and running for 38 seconds.
Also Read : How to install Docker And docker-compose
Video Tutorial
In this post, we have covered some information about the docker swarm and how to enable the docker swarm easily. We have seen how to create a service on the docker swarm and replicas of the container in that service. This is a good feature of the docker swarm that if one container goes down then a copy of the stopped container will be created automatically if you have created replicas of the service. Comment below if you have any queries or doubt regarding this post.


