
Zabbix is a free, open-source monitoring tool which used for monitoring the servers, host machines and network devices as well. Zabbix does monitor for TCP/IP protocols such as SNMP and ICMP. in this post, we will learn how you can we install the Zabbix tool on CentOS 8
Before we proceed, you will require a CentOS 8 instance. If you don’t have one already, you can buy a VPS with Hostinger, GoDaddy or Bluehost at a very cheap price. Deploy a fully managed VPS or cloud server at a very reasonable cost.
Steps to Install Zabbix 5.2 On CentOS 8
Step 1
Zabbix can be installed on localhost or VPS as well. Install LAMP before proceeding to set up and install the Zabbix tool. Visit the below link to get LAMP installation Steps on CentOS 8
Install Httpd and Add Httpd Port in Firewalld
# sudo yum install httpd
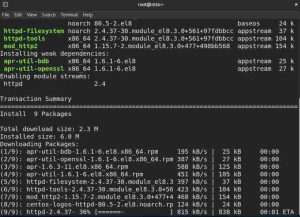
Allow the Apache ports in the firewall to Open Apache Web Server Access
#  firewall-cmd --permanent --add-port=80/tcp

#  firewall-cmd --permanent --add-port=443/tcp
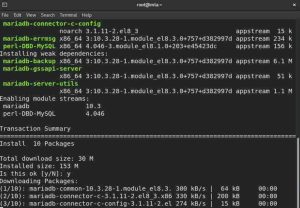
Install MariaDB, Create Database with All Privileges
# sudo yum install mariadb-server
Secure installation MariaDB
# mysql_secure_installation
- Enter current password for root (enter for none):
- Set root password? [Y/n]
- New password :
- Re-enter new password :
- Remove anonymous users? [Y/n] :
- Disallow root login remotely? [Y/n] :
- Remove test database and access to it? [Y/n] :
- Reload privilege tables now? [Y/n] :
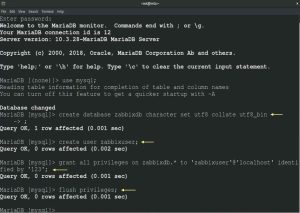
Create uft8 Database, user with All Privileges
# sudo mysql -u root -p

# create database zabbixdb character set utf8 collate utf8_bin;

# create user zabbixuser;

# grant all privileges on zabbixdb.* to 'zabbixuser'@'localhost' identified by '123';
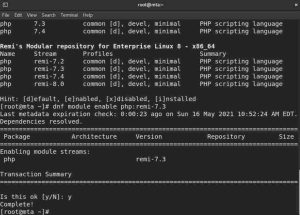
Now, Install PHP Latest Version
Run the below command to install PHP on CentOS 8
# sudo dnf install dnf-utils http://rpms.remirepo.net/enterprise/remi-release-8.rpm

# sudo dnf module list php

# sudo dnf module reset php

# sudo dnf module enable php:remi-7.3
Install some common modules of PHP
# sudo dnf install php php-opcache php-gd php-curl php-mysqlnd

# sudo systemctl enable --now php-fpm
Allow PHP to work with Apache
# sudo chcon -Rt httpd_sys_rw_content_t /var/www

# sudo systemctl restart httpd
Install PHP Extensions
Install PHP XML Extension
# sudo yum install php-xml
Install Mbstring Extension
# sudo yum install php-mbstring

# sudo service httpd restart
Install Intl Extension
# sudo yum --enablerepo=remi install php-intl
Now install APcu Extension
# wget http://rpms.remirepo.net/enterprise/remi-release-7.rpm
   rpm -Uvh remi-release-7.rpm
# sudo yum install php-pecl-apcu

# sudo service httpd restart
Finally, install IMAP php Extension
# sudo yum install php-imap
Step 2
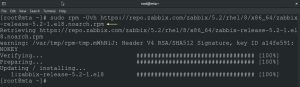
Before installing Zabbix, Add Zabbix 5.2 Repository in a System
# sudo rpm -Uvh https://repo.zabbix.com/zabbix/5.2/rhel/8/x86_64/zabbix-release-5.2-1.el8.noarch.rpm
Step 3
Install Zabbix 5.2 using below command
# sudo yum install -y zabbix-server-mysql zabbix-web-mysql zabbix-agent zabbix-apache-conf
Step 4
Configure Zabbix 5.2. Enter Zabbix Database Password when prompt for Password after below command
# sudo cd /usr/share/doc/zabbix-server-mysql/

# sudo zcat create.sql.gz | mysql -u zabbixuser -p zabbixdb

Next, configure the Zabbix 5.2 Config file. Put MySQL credentials in the Config file. Find below and fill the MySQL Database Credentials
# sudo vi /etc/zabbix/zabbix_server.conf
DBHost=localhost
DBName=zabbixdb
DBUser=zabbixuser
DBPassword=123
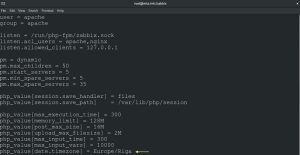
Change the Time Zone, edit the file and remove # for Time Zone
# sudo vi /etc/php-fpm.d/zabbix.conf
php_value[date.timezone] = Europe/London
Step 5
Add Zabbix Port 10050 and 10051 in Firewalld
# sudo firewall-cmd --zone=public --permanent --add-port=10050/tcp

# sudo firewall-cmd --zone=public --permanent --add-port=10051/tcp

# sudo firewall-cmd --reload
Step 6
Restart Zabbix Server, Agent and Httpd
# sudo systemctl start zabbix-server

# sudo systemctl start zabbix-agent

# sudo systemctl start httpd
Step 7
Once all the prerequisites are finished, next thing is to open any browser and place Zabbix URL as per your Zabbix Server IP Address, you will see a Zabbix 5.2 Welcome Page. My IP Address is 192.168.10.200, put your IP Address
http://192.168.10.200/zabbix
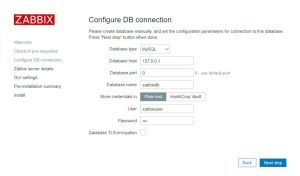
Click on Next to Fill Database Details which we have created earlier
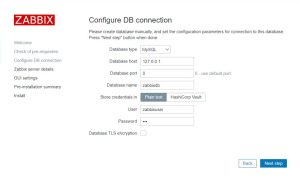
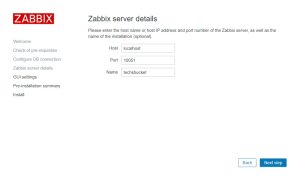
On the next screen, fill out Hostname, Port and Database Server Name
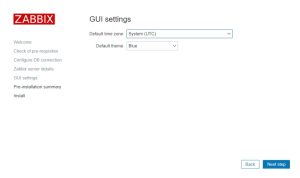
Choose the Time and Zabbix Theme or leave it Default
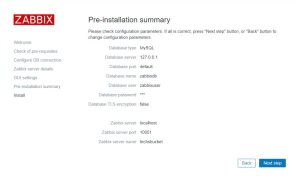
The next page will show the configuration summary of the Database Details which you have provided during the Zabbix Setup
If All the steps are properly done, you will get congratulations message in the next screen
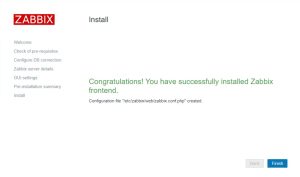
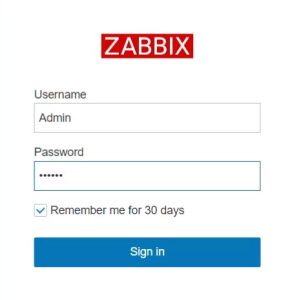
Finally, login page will appear. Login with Default Zabbix username and password. Login Name will be “Admin” and Password is ” zabbix “
Also Read : How to Install LMS Moodle step by step
Video Tutorial
In this tutorial, we have covered how to install Zabbix 5.2 on CentOS 8 Operating System step by step. Comment below for your queries and suggestion or you can contact me any time via the contact page. I will be assisting you and try my best to clear your all doubts.


Good post very informative
really..the given steps are working perfectrly