Interspire is a very popular email marketing application that you may have heard about and who has not heard, I have brought this post for them today. In this post we will see how to install and configure Interspire Email Marketing application on Ubuntu operating system.
What is Interspire ?
It is a bulk email sending application that can be installed and configured in a dedicated Linux server with a dedicated IP address and Domain. With the Interspire application, we can shoot around 2 to 3 lac emails in a day with multiple emailing campaign and scheduled time. This will make very easy to spread your business direct to your subscribers.
System Requirement
If we go with a cloud server then you can buy a VPS server to set up the Interspire. You will get a dedicated IP address along with VPS which will be accessible globally with a Public IP address. In this post, we are going to install in a localhost Ubuntu 18.04
To install the Interspire Application on a physical Machine you will require the following configuration.
1. Ubuntu Operating System
2. Core2Duo Processor or Above
3. Minimum 2GB RAM
4. 1 Dedicated IP Address 2 Domains
You can install Interspire Bulk Emailer in a Local Host by Private IP Locally or in a Virtual Private Server Globally by Public IP. To Buy a Premium and Cheapest VPS visit Hostinger , BlueHost or GoDaddy Here you will find a good deal along with domain name
Why 2 Domain Name ?
I will suggest purchasing 2 Domain names. One Domain will be used in Interspire URL and another Domain will be used for bulk emailing purposes hence chances of blacklisting will below.
To start setting up Interspire make sure you should have installed and configured the following services first to run the Interspire without any error
1. Edit Hostname and Domain Name, Point to Server IP Address
2. Install and Configure Apache to Run the Interspire on the web page
3. Install and Configure MySQL with Database
4. Install and Configure PHP 5.6 to load Interspire Scripts
5. Download Interspire Email Marketer from Official Website
6. Create a Host Entry in Windows Machine
Also Read : How to Install Jenkins On Linux
Step 1
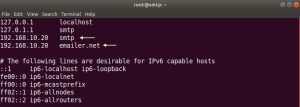
Before we proceed to install services, edit your server hostname and domain name and point both to the server IP Address and reboot the system. My Hostname is smtp and my domain name is emailer.net
# sudo vi /etc/hosts
Step 2
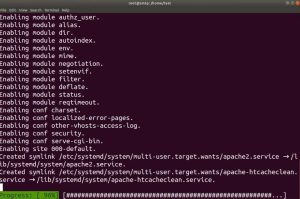
Once Reboot did, install Apache2
# sudo apt update

# sudo apt install apache2
Allow the Apache Ports in the Firewall
# sudo ufw allow 80

# sudo ufw allow 443

# sudo ufw allow ssh

# sudo ufw reload
Start and Enable Apache2 services
# sudo systemctl start apache2

# sudo systemctl enable apache2
Step 3
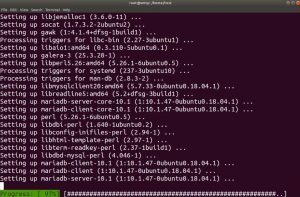
Install MySQL Server and Create Database
# sudo apt install mysql-server
Also Read : How to Setup Postfix On CenntOS 7
The next step is to secure the installation of MySQL
# sudo mysql_secure_installation
- Enter current password for root (enter for none):
- Set root password? [Y/n]
- New password :
- Re-enter new password :
- Remove anonymous users? [Y/n] :
- Disallow root login remotely? [Y/n] :
- Remove test database and access to it? [Y/n] :
- Reload privilege tables now? [Y/n] :
Once installation is done, start and enable MySQL
# sudo systemctl start mysql

# sudo systemctl enable mysql
Allow MySQL Port in Firewall
# sudo ufw allow 3306

# sudo ufw reload
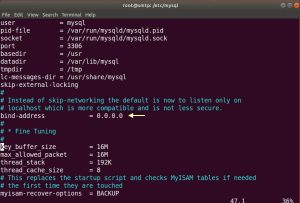
Now very important, edit MySQL config file to allow remote database permission from all hosts, otherwise interspire installation won’t process. Change bind-address from 127.0.0.1 to 0.0.0.0
# sudo cd /etc/mysql/

# sudo  vi mysql.conf.d/mysqld.cnf
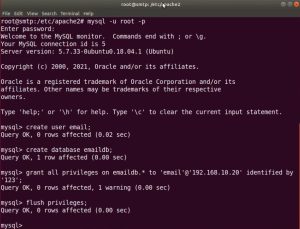
Create Database along with user and Grant All Privileges ( Full Permission )
# create user email;

# create database emaildb;

# grant all privileges on emaildb.* to 'email'@'192.168.10.20' identified by 'your-pass';

# flush privileges;
Step 4
Install and Configure Older Version PHP 5.6 to load Interspire Scripts. Run following command one by one
Interspire does not support the latest PHP 7.XX because set_magic_quotes_runtime php is removed in the latest PHP version.
# sudo apt install python-software-properties

# sudo add-apt-repository ppa:ondrej/php

# sudo apt-get update

# sudo apt install php5.6
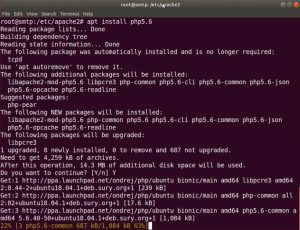
Install PHP 5.6 Extension to Run Interspire Email Marketer Without Any Error
# sudo apt-get install libapache2-mod-php5.6 php5.6-cgi php5.6-cli php5.6-curl php5.6-imap php5.6-gd php5.6-mysql php5.6-pgsql php5.6-sqlite3 php5.6-mbstring php5.6-json php5.6-bz2 php5.6-mcrypt php5.6-xmlrpc php5.6-gmp php5.6-xsl php5.6-soap php5.6-xml php5.6-zip php5.6-dba
Also Read : How to Add Contact List On Interspire
Step 5
Download Interspire Email Marketer from its Official Website and place the Interspire folder into /var/www/html and rename it to your desire name. I have renamed the folder to emailer
Grant permission on the config file as well as temp and storage folders from Interspire
# cd /var/www/html/emailer/centre

# chmod 666 admin/includes/config.php

# chmod 777 admin/temp

# chmod 777 -R admin/com/storage

Step 6
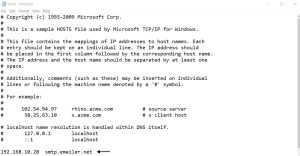
Create a Host Entry in a Windows Machine if you are trying to access Interspire locally with a Private IP Address. Run notepad with Admin privileges and navigate to the following directory
C:\Windows\System32\drivers\etc
Open the Hosts file and create an entry for your fully qualified domain name
Steps To Configure Interspire Email Marketer
Once the above steps are done properly then proceed to install Interspire Email Marketer
Step 1
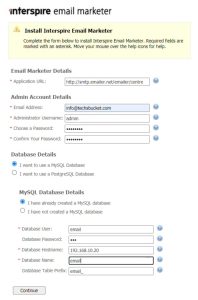
Open Any Internet Browser and Put Interspire URL as per your Fully Qualified Domain Name (FQDN) and Interspire Folder Name. My FQDN Name is smtp.emailer.net and Interspire folder names are emailer/centre , so my URL will be smtp.emailer.net/emailer/centre/. You will see following screen where Interspire username, password need to create and need to put MySQL database credentials which we have created in above step then click continue
Step 2
Finally, the login screen will appear on the next screen. Login with credentials that you have created in Step 1

Video Tutorial
In this tutorial we have revealed, how to install and configure Interspire Bulk Emailer on Ubuntu 18.04. Share this post with your friends who are interested in email marketing. Contact me if you have any queries or comment below to ask your doubts regarding the post. Thank You