Hello Friends.. Today’s post is about, how to Download, Install and Configure WordPress on Linux CentOS 8. WordPress is an open-source script that can be downloaded from its official website. Here I am going to show you super easy steps to configure it on CentOS 8 Operating System.
What is WordPress?
WordPress is open source and free management system to create your own websites or blogs. This is the most popular for creating websites and publish the websites globally. WordPress allows lot of its own themes and plugin as well as third party themes and plugins to make it more beautiful and attractive so people can easily attract to your website or blog. WordPress uses the SQL, MongoDB, MariaDB etc to store all its data. Once WordPress installed you can start creating the posts, pages, themes and so on.
Prerequisites
To install WordPress in CentOS 8, you will require the following services to be installed first to make it properly run without any error.
Step 1
Download WordPress script from its official site and extract it to the Apache root directory /var/www/html or you may create folder under html and extract there in the folder
Step 2
Install httpd Service to run WordPress on Web Browser
#  sudo yum check-update

#  sudo yum update -y

#  sudo yum install httpd -y
Once installation done, start the apache service and enable it on the boot
#  sudo systemctl start httpd.service

#  sudo systemctl enable httpd.service
If firewall installed and running, we need to add some apache ports from following command to open access
#  firewall-cmd --permanent --add-port=80/tcp

#  firewall-cmd --permanent --add-port=443/tcp
Restart the firewall service by following command
# firewall-cmd --reload
Step 3
Allow Apache with full permission on the WordPress Directory. Go to the /var/www/html and use the below command
# cd /var/www/html/

# chown -Rf apache:apache wordpress

# chmod -Rf 755 wordpress
Step 4
Edit the configuration file of Apache and update your IP Address and Domain Name, you will find config file in /etc/httpd/conf/httpd.conf directory
Update the IP Address

Update the Domain Name

Step 5
Create WordPress Httpd Config file in the /etc/httpd/conf directory. Copy and Paste the following and save the config file
# sudo vi /etc/httpd/conf/wordpress.conf
<VirtualHost *:80>
ServerAdmin root@localhost
DocumentRoot /var/www/wordpress
<Directory "/var/www/wordpress">
Options Indexes FollowSymLinks
AllowOverride all
Require all granted
</Directory>
ErrorLog /var/log/httpd/wordpress_error.log
CustomLog /var/log/httpd/wordpress_access.log common
</VirtualHost>
Note : Replace the folder name with yours WordPress folder name ( /var/www/wordpress )
Step 6
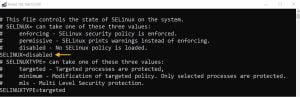
Disable SELinux located in the /etc/selinux/config
# sudo vi /etc/selinux/config
Step 7
Install MariaDB Database Server and Create Database for WordPress
Run following command to install the MariaDB
# sudo yum install mariadb-server
Once the installation has been done, start and make it enable on boot
#  sudo systemctl start mariadb

#  sudo systemctl enable mariadb
Now, secure the MariaDB installation
# mysql_secure_installation
- Enter current password for root (enter for none):
- Set root password? [Y/n] :
- New password :
- Re-enter new password :
- Remove anonymous users? [Y/n] :
- Disallow root login remotely? [Y/n] :
- Remove test database and access to it? [Y/n] :
- Reload privilege tables now? [Y/n] :
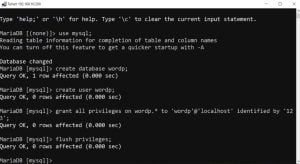
Create SQL Database and SQL user, grant full permission on Database
# sudo mysql -u root -p
Enter your root password which you had set at the time of MariaDB installation and create database as well as give the full permission on the database
#  use mysql

#  create database wordp;

#  create user wordp;

#  grant all privileges on wordp.* to 'wordp'@'localhost' identified by 'yourpassword';
Step 8
Install PHP 7.XX
To Install PHP and its extensions use following commands
# sudo dnf install dnf-utils http://rpms.remirepo.net/enterprise/remi-release-8.rpm

# sudo dnf module list php

# sudo dnf module reset php

# sudo dnf module enable php:remi-7.3
Install some common modules of PHP
# sudo dnf install php php-opcache php-gd php-curl php-mysqlnd

# sudo systemctl enable –now php-fpm
Allow PHP to work with Apache
# sudo chcon -Rt httpd_sys_rw_content_t /var/www

# sudo systemctl restart httpd
Step 9
install Some following supported Extension for WordPress
Install PHP XML Etension
# sudo yum install php-xml
Install Mbstring Extension
# sudo yum install php-mbstring

# sudo service httpd restart
Install Intl Extension
# sudo yum --enablerepo=remi install php-intl
Now install APcu Extension
# wget http://rpms.remirepo.net/enterprise/remi-release-7.rpm
   rpm -Uvh remi-release-7.rpm
# sudo yum install php-pecl-apcu

# sudo service httpd restart
Finally install IMAP php Extension
# sudo yum install php-imap
Steps to Install & Configure WordPress
Once above steps are done properly then we may proceed to install and configure WordPress. Open your web browser with your WordPress server IP address. My server IP address is ‘192.168.10.200‘ , WordPress folder name I kept default ‘wordpress’ and pasted into /var/www/html directory. So, my web URL will be 192.168.10.200/wordpress
Step 1
Open web browser and put your server IP address. If you extracted WordPress folder files in the /var/www/html directory then you will have to put only IP Address in the browser. In my case, I have pasted folder in the /var/www/html therefore my URL will be 192.168.10.200/wordpress. Once page open click on Let’s Go

Step 2
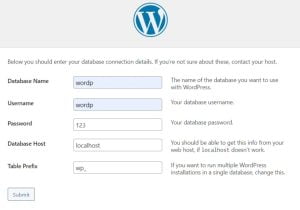
Fill out the correct Database Details which you have created earlier for WordPress and hit Submit
Step 3
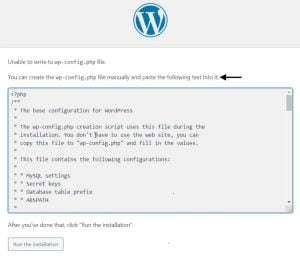
In this step, you will see some scripts which need to be uploaded in the WordPress directory config.php file. Create config.php file under the /var/www/html or /var/www/html/wordpress/ ( As per wordpress files and as per your folder name ) folder and paste the given script in the file and save it.
Once file config.php file is created and saved with the given scripts, simply go back to the web browser and hit Run The Installation
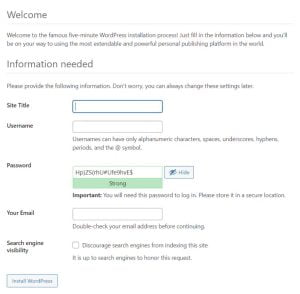
Step 4
On the next page fill out the basic details like WordPress Admin username, password and email then hit the Install WordPress
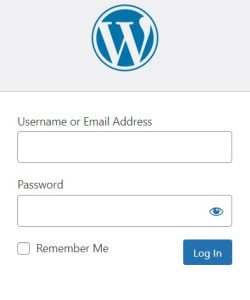
Step 5
Finally, you will see the login screen for WordPress. Just put the username which you have created in the previous step. The default WordPress login URL will be “youripaddress/wp-admin”
Also Read : How to install phpMyAdmin on Linux
Video Tutorial
So.. in this post, we have covered how to install and configure WordPress on CentOS 8 with some easy steps which I have shown very simply. Try to follow these steps and feel free to ask by a comment about your any doubts or query, learn and share with others too.. Thank You.