Hi Everyone, today in this post we are going to learn about phpMyAdmin Installation and Configuration step by step on CentOS 8 along with a Video Tutorial. phpMyAdmin is very useful to access MySQL Databases which gives a beautiful Graphical Interface to access all the Databases over the Web Browser.
What is phpMyAdmin
phpMyAdmin allows you to access all your MySQL Databases Graphically over the Web Browser. This is very useful and helpful to reset forgotten Database usernames and passwords. phpMyAdmin manages Databases of MySQL and MariaDB. Managing databases, tables, columns, relations, indexes, users, and permissions can be performed via Web Browser which gives a good user interface mode and things become interesting and simple so you do not have to perform syntax over the command-line interface.
- Good and Interesting Web Interface
- Create, Drop, Rename, and Alter the Databases
- Manages Privileges of MySQL user accounts
- Creating graphics of your database layout in various formats
- Data can be exported into CSV, SQL, XML, PDF, OpenDocument Text and Spreadsheet, Word
- Allows Administering of Multiple Servers and So On.
Steps to Install phpMyAdmin on CentOS 8
To install and Configure phpMyAdmin, you should have the following services installed and enabled first on your CentOS 8 Server, here are the steps.
Step 1
Install Apache Server
To install Apache Server run the below command and start the services, first update the server.
# yum update -y

# yum install httpd

# systemctl start httpd.service

# systemctl enable httpd.service
Allow the Apache ports in the firewall
#  firewall-cmd --permanent --add-port=80/tcp

#  firewall-cmd --permanent --add-port=443/tcp
Step 2
Install MariaDB
Run the following command to install MariaDB
# sudo yum install mariadb-server
After installation, start MariaDB and enable it on boot
# sudo systemctl start mariadb

# sudo systemctl enable mariadb
Secure installation MariaDB
# mysql_secure_installation
- Enter current password for root (enter for none):
- Set root password? [Y/n]
- New password :
- Re-enter new password :
- Remove anonymous users? [Y/n] :
- Disallow root login remotely? [Y/n] :
- Remove test database and access to it? [Y/n] :
- Reload privilege tables now? [Y/n] :
Check the status after installation by following command, if MariaDB has successfully started then the status should be active.
# sudo systemctl status mariadb

Step 3
Install PHP 7.XX
Run the below command to install PHP on CentOS 8
# sudo dnf install dnf-utils http://rpms.remirepo.net/enterprise/remi-release-8.rpm

# sudo dnf module list php

# sudo dnf module reset php

# sudo dnf module enable php:remi-7.3
Install some common modules of PHP
# sudo dnf install php php-opcache php-gd php-curl php-mysqlnd

# sudo systemctl enable --now php-fpm
Allow PHP to work with Apache
# sudo chcon -Rt httpd_sys_rw_content_t /var/www

# sudo systemctl restart httpd
Step 4
Install Extensions
Install PHP XML Extension
# sudo yum install php-xml
Install Mbstring Extension
# sudo yum install php-mbstring

# sudo service httpd restart
Install Intl Extension
# sudo yum --enablerepo=remi install php-intl
Now install APcu Extension
# wget http://rpms.remirepo.net/enterprise/remi-release-7.rpm
   rpm -Uvh remi-release-7.rpm
# sudo yum install php-pecl-apcu

# sudo service httpd restart
Finally install IMAP php Extension
# sudo yum install php-imap
Step 5
Download and Unzip phpMyAdmin
Download phpMyAdmin from the official website and place it in the Apache root directory.
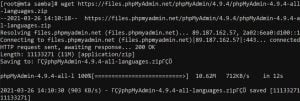
# sudo cd /var/www/html/

# wget https://files.phpmyadmin.net/phpMyAdmin/5.1.0/phpMyAdmin-5.1.0-all-languages.zip

# unzip phpMyAdmin-5.1.0-all-languages.zip
Step 6
Rename And Allow Apache Ownership
In this step, rename the phpMyAdmin, Configuration file and Allow Apache Ownership
# mv phpMyAdmin-5.1.0-all-languages phpmyadmin

# sudo cd /var/www/html/phpmyadmin

# sudo mv config.sample.inc.php config.inc.php

# sudo chown -R apache:apache /var/www/html/phpmyadmin
Step 7
Update MySQL Secure Password
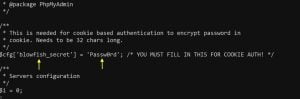
Edit the config file and define your MySQL secure password. Find the below-given line and save the file once edit done
$cfg[‘blowfish_secret’] = ‘your-secure-password’;
# sudo cd /var/www/html/phpmyadmin

# sudo vi config.inc.php
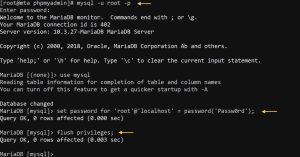
Note : If you want to reset MySQL secure password, follow the below steps
# mysql -u root -p

# set password for 'root'@'localhost' = password('your-pass');

# flush privileges;
Step 8
Import Tables For phpMyAdmin
Once the file is saved, Import the Tables for phpMyAdmin
# mysql < sql/create_tables.sql -u root -p

Step 9
Create Apache Virtual Host file
Create Apache Virtual Host file in the following Directory for phpMyAdmin
# sudo /etc/httpd/conf.d/

# sudo vi phpmyadmin.conf
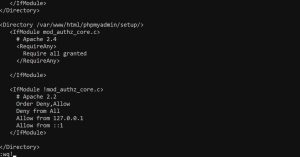
Copy and Paste the below-given lines and save the file
Alias /phpmyadmin /var/www/html/phpmyadmin

<Directory /var/www/html/phpmyadmin/>
AddDefaultCharset UTF-8

<IfModule mod_authz_core.c>
# Apache 2.4
<RequireAny>
Require all granted
</RequireAny>
</IfModule>
<IfModule !mod_authz_core.c>
# Apache 2.2
Order Deny,Allow
Deny from All
Allow from 127.0.0.1
Allow from ::1
</IfModule>
</Directory>

<Directory /var/www/html/phpmyadmin/setup/>
<IfModule mod_authz_core.c>
# Apache 2.4
<RequireAny>
Require all granted
</RequireAny>

</IfModule>

<IfModule !mod_authz_core.c>
# Apache 2.2
Order Deny,Allow
Deny from All
Allow from 127.0.0.1
Allow from ::1
</IfModule>

</Directory>
Restart the Apache Service and Enable it on Boot
# sudo systemctl restart httpd

# sudo systemctl enable httpd
Step 10
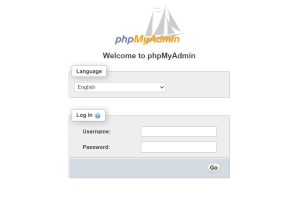
Access phpMyAdmin
Finally, open your Web Browser and Put the URL (Replace IP with Your Server IP)
192.168.10.200/phpmyadmin
Also Read : How to install Android Studio on Linux
Video Tutorial
In this tutorial, we have covered how to install phpMyAdmin on CentOS 8 Operating System step by step. Comment below for your queries and suggestion or you can contact me any time via the contact page. I will be assisting you and try my best to clear your all doubts.