After installing the required binaries. Copy the preconfigured repository file from the Symas repository.
The following steps you get will make ldap up and running quickly.
Install the Symas OpenLDAP Package desired
- Symas-OpenLDAP-Client contains only client libraries and commands. Use this on systems where access to Symas OpenLDAP is required but where the server software is not required.
- Symas-OpenLDAP-Nonopt removes optimization flags from the standard server/client install. Reduces performance, but increases were debugging and troubleshooting abilities.
- Symas-OpenLDAP (i.e., server installer) contains all client and server components required to set up a fully functional LDAP directory.
- Symas-OpenLDAP-Devel is used if the purpose is to develop software based on libraries that are a part of Syas-OpenLDAP.
# wget -q https://repo.symas.com/configs/SOFL/rhel8/sofl.repo -O /etc/yum.repos.d/sofl.repo
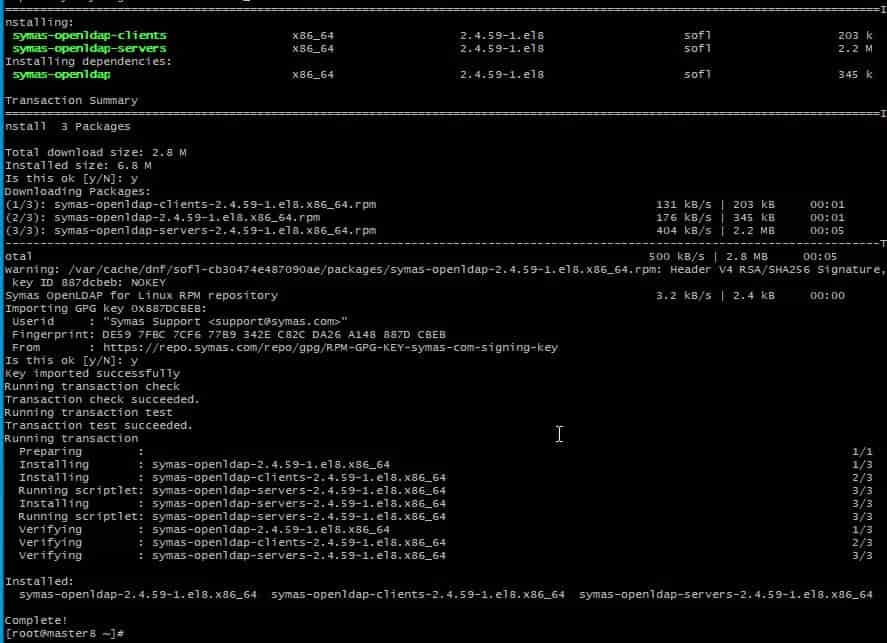
- Install packages symas-openldap-client and symas-openldap-servers.
# dnf install symas-openldap-clients symas-openldap-servers -y
- Start the service.
# systemctl start slapd
- Generate an LDAP password from a secret key.
# slappasswd -s rocky -n > /etc/openldap/passwd
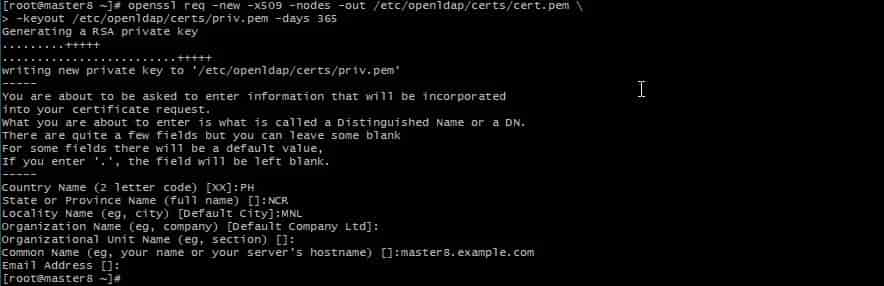
- New certificate needs to generated X509 valid for 365 days.
# openssl req -new -x509 -nodes -out /etc/openldap/certs/cert.pem -keyout /etc/openldap/certs/priv.pem -days 365
- In addition, Move the generated content to /etc/openldap/certs directory on master ldap.Copy the cert.pem to the client to authenticate with ldap connection.
# cd /etc/openldap/certs.
# chown ldap:ldap *
# chmod 600 priv.pem
Prepare the database template included in OpenLDAP installed
# cp -r /usr/share/openldap-servers/DB_CONFIG.example /var/lib/ldap/DB_CONFIG
- Generate database file.
[root@master ~]#slaptest
config file testing succeeded
[root@master ~]#
- So Change ownership of database files.
# chown ldap:ldap /var/lib/ldap/*
- Activate the slapd service on boot & will start right away.
# systemctl enable slapd --now
- So Check the service if it’s running.
# netstat -lt | grep ldap
tcp 0 0 0.0.0.0:ldaps 0.0.0.0:* LISTEN

tcp 0 0 0.0.0.0:ldap 0.0.0.0:* LISTEN

- Setup root password.
# slappasswd
New password:
Re-enter new password:
{SSHA}xxxxxxxxxxxxxxxxxxxxxxxx
# vi chroot.ldif
# specify the password generated above for "olcRootPW" section
dn: olcDatabase={0}config,cn=config
changetype: modify
add: olcRootPW
olcRootPW: {SSHA}xxxxxxxxxxxxxxxxxxxxxxxx
# ldapadd -Y EXTERNAL -H ldapi:/// -f chroot.ldif
SASL/EXTERNAL authentication started
SASL username: gidNumber=0+uidNumber=0,cn=peercred,cn=external,cn=auth
SASL SSF: 0
modifying entry "olcDatabase={0}config,cn=config"
We are configured to add the cosine, nis & inetorgperson LDAP schemas.
# ldapadd -Y EXTERNAL -H ldapi:/// -f /etc/openldap/schema/cosine.ldif
SASL/EXTERNAL authentication started
SASL username: gidNumber=0+uidNumber=0,cn=peercred,cn=external,cn=auth
SASL SSF: 0
adding new entry "cn=cosine,cn=schema,cn=config"
# ldapadd -Y EXTERNAL -H ldapi:/// -f /etc/openldap/schema/nis.ldif
SASL/EXTERNAL authentication started
SASL username: gidNumber=0+uidNumber=0,cn=peercred,cn=external,cn=auth
SASL SSF: 0
adding new entry "cn=inetorgperson,cn=schema,cn=config"
# ldapadd -Y EXTERNAL -H ldapi:/// -f /etc/openldap/schema/inetorgperson.ldif
SASL/EXTERNAL authentication started

SASL username: gidNumber=0+uidNumber=0,cn=peercred,cn=external,cn=auth

SASL SSF: 0

adding new entry “cn=inetorgperson,cn=schema,cn=config”
- Create the changes.ldif file in directory /etc/openldap/ . Paste the output lines with {SSHA } with {SSHA}xxx generated by slappasswd.
# slappasswd
New password:

Re-enter new password:

{SSHA}xxxxxxxxxxxxxxxxxxxxxxxx
- So DB name is now mdb.The information stored in the mdb backend can be found /etc/openldap/slapd.d/cn=config/olcDatabase={2}mdb.ldif file.
# vi /etc/openldap/changes.ldif
dn: olcDatabase={2}mdb,cn=config

changetype: modify

replace: olcSuffix

olcSuffix: dc=example,dc=com

dn: olcDatabase={2}mdb,cn=config

changetype: modify

replace: olcRootDN

olcRootDN: cn=Manager,dc=example,dc=com

dn: olcDatabase={2}mdb,cn=config

changetype: modify

replace: olcRootPW

olcRootPW: {SSHA}xxxxxxxxxxxxxxxxxxxxxxxx

dn: cn=config

changetype: modify

replace: olcTLSCertificateFile

olcTLSCertificateFile: /etc/openldap/certs/cert.pem

dn: cn=config

changetype: modify

replace: olcTLSCertificateKeyFile

olcTLSCertificateKeyFile: /etc/openldap/certs/priv.pem

dn: olcDatabase={1}monitor,cn=config

changetype: modify

replace: olcAccess

olcAccess: {0}to * by dn.base=”gidNumber=0+uidNumber=0,cn=peercred,cn=external,cn=auth” read by dn.base=”cn=Manager,dc=example,d
c=com” read by * none
- Import the configuration to the machine. This will be the main entry in the LDAP directory.
# ldapmodify -Y EXTERNAL -H ldapi:/// -f /etc/openldap/changes.ldif
SASL/EXTERNAL authentication started

SASL username: gidNumber=0+uidNumber=0,cn=peercred,cn=external,cn=auth

SASL SSF: 0

modifying entry “olcDatabase={2}mdb,cn=config”

modifying entry “olcDatabase={2}mdb,cn=config”

modifying entry “olcDatabase={2}mdb,cn=config”

modifying entry “cn=config”

modifying entry “cn=config”

modifying entry “olcDatabase={1}monitor,cn=config”
- Verify configuration
# slaptest -u
The output should look like the output.
# config file testing succeeded
- Create /etc/openldap/base.ldif with the configuration below.
vi /etc/openldap/base.ldif
dn: dc=example,dc=com

dc: example

objectClass: top

objectClass: domain

dn: ou=People,dc=example,dc=com

ou: People

objectClass: top

objectClass: organizationalUnit

dn: ou=Group,dc=example,dc=com

ou: Group

objectClass: top

objectClass: organizationalUnit
# ldapadd -x -w redhat -D cn=Manager,dc=example,dc=com -f /etc/openldap/base.ldif
Create users by creating the file users.ldif
# vi users.ldif
dn: uid=user01,ou=People,dc=example,dc=com

uid: user01

cn: user01

objectClass: account

objectClass: posixAccount

objectClass: top

objectClass: shadowAccount

userPassword: {crypt}$6$zz2TKRQVGLyPJoTU$//n.UkHKrrfkeUQUOund2QbSGRMXjU0GV73o.UlprOB3CxBxmQArsESrNUUHC7v3ZhwojszXGh7LowRSnjWhG.

shadowLastChange: 18818

shadowMin: 0

shadowMax: 99999

shadowWarning: 7

loginShell: /bin/bash

uidNumber: 1001

gidNumber: 1001

homeDirectory: /home/guests/user01
- Test the configuration if the user is now present.
# ldapsearch -x cn=user01 -b dc=example,dc=com
- The output should look like.
[root@master8 ~]# ldapsearch -x cn=user01 -b dc=example,dc=com
#extended LDIF
#

#LDAPv3
#base with scope subtree
#filter: cn=user01
#requesting: ALL
# user01, People, example.com

dn: uid=user01,ou=People,dc=example,dc=com
uid: user01
cn: user01
objectClass: account
objectClass: posixAccount
objectClass: top
objectClass: shadowAccount
userPassword:: e2NyeXB0fSQ2JHp6MlRLUlFWR0x5UEpvVFUkLy9uLlVrSEtycmZrZVVRVU91bmQ
yUWJTR1JNWGpVMEdWNzNvLlVscHJPQjNDeEJ4bVFBcnNFU3JOVVVIQzd2M1pod29qc3pYR2g3TG93
UlNualdoRy4=
shadowLastChange: 18818
shadowMin: 0
shadowMax: 99999
shadowWarning: 7
loginShell: /bin/bash
uidNumber: 1001
gidNumber: 1001
homeDirectory: /home/guests/user01

user01, Group, example.com
dn: cn=user01,ou=Group,dc=example,dc=com
objectClass: posixGroup
objectClass: top
cn: user01
userPassword:: e2NyeXB0fXg=
gidNumber: 1001

search result
search: 2
result: 0 Success

numResponses: 3
numEntries: 2
Conclusion
So The installation of OpenLDAP is quite simple if the steps you follow correctly. However, if the are steps that would not follow, the service would not run properly. Symas OpenLDAP is a fantastic alternative to compiling your openldap package from openldap.org. In my perspective, there is no better learning hands-on than theory. Finally, it has been a journey exploring new things by heart and loving what you do.
A big thank you for exploring TechsBucket! Your visit means a lot to us, and we’re grateful for your time on our platform. If you have any feedback or suggestions, we’d love to hear them. Looking forward to serving you again soon!