Hello Friends… Today we are going to learn, how to install osTicket and its configuration. This is an open-source ticketing system that can be installed in CentOS easily. Here I am going to show you some easy steps to install and configure the osTicket system into your CentOS operating system.
What is osTicket ?
osTicket is a ticketing system that helps to customers to raise their queries to the Helpdesk support. The helpdesk will receive a complaint in the form of a Ticket number with the complaint details raised by the customer. Helpdesk can revert the ticket as per the work done on that customer ticket. osTicket provides you the simplest dashboard for its Admin and Customer Which makes it a lot easier, osTicket can be linked with on Premise Active Directory too. Let see its Installation and Configuration.
How to Install osTicket in CentOS 8 ?
To install osTicket you will require the following services with osTicket script files in the CentOS 8
Prerequisites
Step 1: Install Apache HTTP Server
Step 2: Install MariaDB Database Server
Step 3: Install PHP 7.XX
Step 4: PHP XML Etension, Mbstring Extension, Intl Extension, APcu Extension, IMAP php Extension
Step 5: Download osTicket Latest Release
Step 1
Install Apache Server
To install Apache Server run the below command and start the services, first update the server.
# yum update -y

# yum install apache

# systemctl start apache.service

# systemctl enable apache.service
Allow the Apache ports in the firewall
#  firewall-cmd --permanent --add-port=80/tcp

#  firewall-cmd --permanent --add-port=443/tcp
Step 2
Install MariaDB Database Server
Run the following command to install MariaDB
# sudo yum install mariadb-server
After installation, start MariaDB and enable it on boot
# sudo systemctl start mariadb

# sudo systemctl enable mariadb
Secure installation MariaDB
# mysql_secure_installation
- Enter current password for root (enter for none):
- Set root password? [Y/n]
- New password :
- Re-enter new password :
- Remove anonymous users? [Y/n] :
- Disallow root login remotely? [Y/n] :
- Remove test database and access to it? [Y/n] :
- Reload privilege tables now? [Y/n] :
Check the status after installation by the following command, if MariaDB has successfully started then the status should be active.
# sudo systemctl status mariadb
Create Database user and password which will be used in osTicket configuration
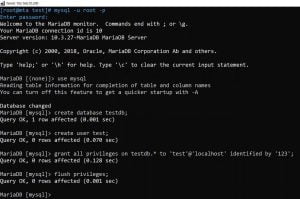
# sudo mysql -u root -p
Enter your root password which you had set at the time of MariaDB installation and create a database as well as set the full permission on the database
# use mysql

# create database testdb;

# create user test;

# grant all privileges on testdb.* to 'test'@'localhost' identified by 'yourpassword';

# flush privileges;
Step 3
Install PHP 7.XX
Run the below command to install PHP on CentOS 8
# sudo dnf install dnf-utils http://rpms.remirepo.net/enterprise/remi-release-8.rpm

# sudo dnf module list php

# sudo dnf module reset php

# sudo dnf module enable php:remi-7.3
Install some common modules of PHP
# sudo dnf install php php-opcache php-gd php-curl php-mysqlnd

# sudo systemctl enable --now php-fpm
Allow PHP to work with Apache
# sudo chcon -Rt httpd_sys_rw_content_t /var/www

# sudo systemctl restart httpd
Step 4
Install osTicket supported Extension
Remember, these extensions are mandatory to run the osTicket, without these extensions you will not able to install osTicket.
Install PHP XML Extension
# sudo yum install php-xml
Install Mbstring Extension
# sudo yum install php-mbstring

# sudo service httpd restart
Install Intl Extension
# sudo yum --enablerepo=remi install php-intl
Now install APcu Extension
# wget http://rpms.remirepo.net/enterprise/remi-release-7.rpm
   rpm -Uvh remi-release-7.rpm
# sudo yum install php-pecl-apcu

# sudo service httpd restart
Finally, install IMAP php Extension
# sudo yum install php-imap
Step 5
Download osTicket
Download osTicket from the official website and place it in the Apache root directory.
# cd /var/www/html/
If you are done with the above steps, we can proceed to install and configure osTicket 🙂
Install and Configure osTicket
To start the installation of osTicket, you will have to open your web browser with your osTicket server IP address. My server IP address is ‘192.168.10.200‘ , osTicket folder renamed from ‘upload‘ to ‘testmail.in‘ and ‘scp‘ is the osTicket configuration folder so the link will be as follow. If you see all extensions are in green you will get the continue button otherwise you will have to recheck the above given steps.
192.168.10.200/testmail.in/scp
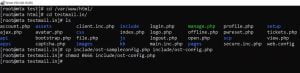
The next step is to create a backup of your osTicket config file, this is recommended before making any changes to osTicket configuration file. Navigate the path /var/www/html/testmail.in/ via Terminal and paste the given command by osTicket.
# cp include/ost-sampleconfig.php include/ost-config.php
Set the permission on the config file with the below command
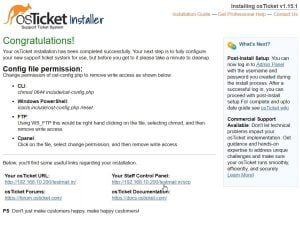
# chmod 0666 include/ost-config.php
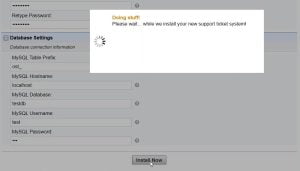
Now, fill up the basic details like email address and osTicket Admin login and password on the next screen. In this screen, you will have to also fill in the Database details which you have created by the steps given above. Fill in all the details and hit install now.
Finally, you will see the below screen saying ” congratulations “. In this screen there will be Admin and Customer links details just save all that links to distribute customers agents and admins.
Also Read : How to install Open SSL / HTTPS On Ubuntu
Video Tutorial
So.. in this post, we have covered how to install and configure osTicket on CentOS 8 with some easy steps which I have shown very simply. Try to follow these steps and feel free to ask by a comment about your any doubts, learn and share with others too.. Thank You..